iptables Tutorial 1.1.0
Oskar Andreasson
blueflux@koffein.net
Copyright © 2001 by Boingworld organisation
Reproduction only allowed if written consent from responsible Boingworld crew-member is given.
All Rights Reserved.
- Table of Contents
- Introduction
- Preparations
- rc.firewall file
-
- example rc.firewall
- explanation of rc.firewall
-
- Initial loading of extra modules
- Initiating the kernel for IP forwarding and others
- Actually starting the masquerading
- Displacement of rules to different chains
- Setting up the different chains used
- PREROUTING chain of the nat table
- INPUT chain
- The TCP allowed chain
- ICMPchain
- TCP chain
- UDP chain
- OUTPUT chain
- FORWARD chain
- Example scripts
- Passive FTP but no DCC
- State NEW packets but no SYN bit set
- ISP's who use assigned IP's
- Updating and flushing your tables
- Other resources and links
- Contributers
- Example rc.firewall script
- Example rc.DMZ.firewall script
- Example rc.DHCP.firewall script
- Example rc.flush-iptables script
Introduction
Why ?
Well, I found a big empty space in the HOWTO's out there lacking in information about the new Iptables functions in the new Linux 2.4.x kernels, among other things, I'm going to try to answer questions that some might have about the new possibilities like state matching. Is it possible to allow passive FTPs to your server, but not allow outgoing DCCs from IRC as an example? I will build this all up from an example rc.firewall file that you can use in your /etc/rc.d/ scripts. Yes, this file was originally based upon the masquerading HOWTO for those of you who recognize it.
Also, there's a small script that I wrote just in case you screw up as much as I did during the configuration available as rc.flush-iptables.txt.
How ?
I've placed questions to Marc Boucher and others from the core netfilter team. A big thanks going out to them for their work and for their help on this tutorial I'm writing for boingworld.com. This document will guide you through the setup process step by step, hopefully make you understand some more about the iptables package. I will base most of the stuff here on the example rc.firewall file since I find that to be a good way to learn how to use iptables. I have decided to just follow the basic chains and from there go down into each and one of the chains traversed in each due order. This tutorial has turned a little bit harder to follow this way but at the same time it is more logical. Whenever you find something that's hard to understand, just consult this tutorial.
Who are you ?
I'm someone with too many old computers on my hands, sitting with my own LAN and wanting them all to be connected to the Internet, at the same time having it fairly secure. The new iptables is a good upgrade from the old ipchains in this regard. Before, you could make a fairly secure network by dropping all incoming packages not destined to certain ports, but this would be a problem with things like passive FTPs or outgoing DCCs in IRC, which assigns ports on the server, tells the client about it, and then lets the client connect. There was some child diseases in the iptables code that I ran into in the beginning, and in some respects I found the code not quite ready for release in full production. Today, I'd recommend everyone who uses ipchains or even older ipfwadm etc to upgrade unless they're happy with what their current code is capable of and if it does what they need it to.
Preparations
Where to get it ?
The iptables userspace package can be downloaded from the netfilter homepage. The iptables package also makes use of kernel space facilities which can be configured into the kernel during make configure. The necessary pieces will be discussed a bit further down in this document.
Kernel setup
To run the pure basics of iptables you need to configure the following options into the kernel while doing make config or one of it's related commands. :
CONFIG_PACKET - This option allows applications and programs that needs to work directly to certain network devices. An example would be tcpdump or snort.
CONFIG_NETFILTER - This option is required if you're going to use your computer as a firewall or gateway to the internet. In other words, this is most definitely required if for anything in this tutorial to work at all. I assume you'll want this since you're reading this at all.
And of course you need to add the proper drivers for your interfaces to work properly, ie. Ethernet adapter, PPP and SLIP interfaces. The above will only add some of the pure basics in iptables. You won't be able to do anything to be pretty honest, it just adds the framework to the kernel. If you want to use the more advanced options in IPTables, you need to set up the proper configuration options in your kernel. Here we will show you the options available in a basic 2.4.9 kernel and a brief explanation :
CONFIG_IP_NF_CONNTRACK - This module is needed to make connection tracking. Connection tracking is used by, among other things, NAT and Masquerading. If you need to firewall machines on a LAN you most definitely need this option. For example, this module is required by the rc.firewall.txt to work.
CONFIG_IP_NF_FTP - This module is required if you want to do connection tracking on FTP connections. Since FTP connections are quite hard to do connection tracking on in normal cases conntrack needs a so called helper, this option compiles the helper. If you don't add this module you won't be able to FTP through a firewall or gateway properly.
CONFIG_IP_NF_IPTABLES - This option is required if you want do any kind of filtering, masquerading or NAT. It adds the whole IPTables identification framework to kernel. Without this you won't be able to do anything at all with iptables.
CONFIG_IP_NF_MATCH_LIMIT - This module isn't exactly required but it's used in the example rc.firewall.txt. This adds the possibility to control how many packets per minute that's supposed to be matched with a certain rule. For example, -m limit --limit 3/minute would match a maximum of 3 packets per minute. This module can also be used to avoid certain Denial of Service attacks.
CONFIG_IP_NF_MATCH_MAC - This allows us to match packets based on MAC addresses. Every Ethernet adapter has it's own MAC address. We could for instance block packets based on what MAC address used and block a certain computer pretty well since the MAC address don't change. We don't use this option in the rc.firewall.txt example or anywhere else.
CONFIG_IP_NF_MATCH_MARK - This allows us to use a MARK match. For example, if we use the target MARK we could mark a packet and then depending on if this packet is marked further on in the table, we can match based on this mark. This option is the actual match MARK, and further down we will describe the actual target MARK.
CONFIG_IP_NF_MATCH_MULTIPORT - This module allows us to match packets with a whole range of destination ports or source ports. Normally this wouldn't be allowed, but with this match it is possible.
CONFIG_IP_NF_MATCH_TOS - With this match we can match packets based on their TOS field. TOS stands for Type Of Service field. TOS can also be set by certain rules in the mangle table and via the ip/tc commands.
CONFIG_IP_NF_MATCH_TCPMSS - This match allows us to match TCP SYN packets based on their MSS field.
CONFIG_IP_NF_MATCH_STATE - This is one of the biggest news in comparison to IPChains. With this module we can do stateful matching on packets. For example, if we've already seen trafic in two directions in a TCP connection, this packet will be counted as ESTABLISHED. This module is used extensively in the rc.firewall.txt example.
CONFIG_IP_NF_MATCH_UNCLEAN - This module will allow us to match IP, TCP, UDP and ICMP packets that looks strange or are invalid. We could for example drop these packets, but we never know if they are legitimate or not. Note that this match is still experimental and might not work perfectly in all cases.
CONFIG_IP_NF_MATCH_OWNER - This option will allow us to do owner matching. For example, we can allow only the user root to have Internet access. This module was originally just written as an example on what could be done with the new IPTables. Note that this match is still experimental and might not work for everyone.
CONFIG_IP_NF_FILTER - This module will add the basic filter table which will enable you to do basic filtering. In the filter table you'll find the input, forward and output chains. This module is required if you plan to do any kind of filtering on packets that you receive and send.
CONFIG_IP_NF_TARGET_REJECT - This target allows us to specify that an ICMP error message should be sent in reply to incoming packets instead of plainly dropping them to the floor. Mind you that TCP connections are always reset or refused with a TCP RST packet.
CONFIG_IP_NF_TARGET_MIRROR - This allows packets to be bounced back to the sender of the packet. For example, if we set up a MIRROR target on destination port http on our input chain and someone tries to access this port we would plainly bounce his packets back to himself and finally he would see his own homepage.
CONFIG_IP_NF_NAT - This module allows network address translation, or NAT in it's different forms. With this option we can do port forwarding, masquerading etc. Note that this option is required for firewalling and masquerading of a LAN and hence for the example rc.firewall.txt to work properly.
CONFIG_IP_NF_TARGET_MASQUERADE - This module adds the masquerade target. For instance if we don't know what IP we have to the Internet this would be the preferred way of getting the IP instead of using DNAT or SNAT. In other words, if we use DHCP, PPP, SLIP or some other connection that dynamically assigns us an IP, we need to use this target instead of SNAT. Masquerading gives a slightly higher load on the computer than NAT does, but will work without us knowing the IP in advance.
CONFIG_IP_NF_TARGET_REDIRECT - This target is useful together with proxies for example. Instead of letting a packet pass right through, we remap them to go to our local box instead. In other words, we can make a transparent proxy this way.
CONFIG_IP_NF_TARGET_LOG - This adds the LOG target to iptables and the functionality of it. We can use this module to log certain packets to syslogd and hense see the packet further on. This could be useful for forensics or debugging a script you're writing.
CONFIG_IP_NF_TARGET_TCPMSS - This option can be used to overcome ISPs and servers who block ICMP Fragmentation needed packets. This can result in webpages not getting through, small mails getting through while larger mails don't get through, ssh works but scp dies after handshake, etc etc. We can then use the TCPMSS target to overcome this by clamping our MSS (Maximum Segment Size) to the PMTU (Path Maximum Transmit Unit). This way, we'll be able to handle what the authors of netfilter themself call "criminally braindead ISPs or servers" in the kernel configuration help.
CONFIG_IP_NF_COMPAT_IPCHAINS - Adds a compatibility mode with the old IPChains. Do not look at this as any real long term way of solving this.
CONFIG_IP_NF_COMPAT_IPFWADM - Compatibility mode with old ipfwadm. Do absolutely not look at this as a real long term solution.
As you can see, there is a heap of options. I've briefly explained what kind of extra behaviours you can expect from each module here. These are only the options available in a vanilla linux 2.4.9 kernel. If you'd like to get a look at more options, I suggest you look at the patch-o-matic functions in netfilter userland which will add heaps of other options in the kernel. POM fixes are additions that's supposed to be added in the kernel in the future that hasn't quite reached the kernel yet. These functions should be added in the future, but hasn't quite made it in yet. (Note! from recent testing it seems patch-o-matic in netfilter 1.2.3 will not work together with linux kernel 2.4.9 for me. If someone can confirm this for me or if this is only me, I'd appreciate it. I seem to have missed this issue on the netfilter mailing list.)
You will need the following options compiled into your kernel, or as modules, for the rc.firewall.txt script to work. If you need help with the options that the other scripts needs, look at the example firewall scripts section.
CONFIG_PACKET
CONFIG_NETFILTER
CONFIG_IP_NF_CONNTRACK
CONFIG_IP_NF_FTP
CONFIG_IP_NF_IRC
CONFIG_IP_NF_IPTABLES
CONFIG_IP_NF_FILTER
CONFIG_IP_NF_NAT
CONFIG_IP_NF_MATCH_STATE
CONFIG_IP_NF_TARGET_LOG
CONFIG_IP_NF_MATCH_LIMIT
CONFIG_IP_NF_TARGET_MASQUERADE
The above will be required at the very least. In the other example scripts I will explain what requirements they have.
userland setup
All you need to do here is to configure and make the iptables package available at one of the netfilter homepage. Of course, don't forget to install the package, might be a good idea.
rc.firewall file
example rc.firewall
OK, so you've got everything set up and are ready to check out an example rc.firewall file, or at least you should be. This example rc.firewall (also included as appendix) is large and has lots of comments in it so look at that and then come back here for more explanations.
explanation of rc.firewall
Initial loading of extra modules
First, we see to it that the module dependencies files are up to date by issuing an /sbin/depmod -a command. After this we load some modules that we might be interested in. For example, if you want to have support for the , REJECT and MASQUERADE targets and don't have this compiled statically into your kernel, we load these modules.
Next is the option to load ipt_owner module, for example only allowing certain users to make certain connections etc. I will not use that in this example but basically, you could allow only root to do FTP and HTTP connections to redhat and DROP all the others. Or you could disallow all users but your own user and root to connect from your box to the Internet, might be boring for others, but you will be a bit more secure to bouncing hacker attacks etc.
After this there is the first part used by our state matching filters, the loading of ip_conntrack_ftp and ip_conntrack_irc. To do what I preached in the beginning of this file, namely doing state matching, disallowing for example passive FTP but allowing DCC sends to work, we load only the ip_conntrack_ftp module, but not the ip_conntrack_irc module. For this to work, these two must not be compiled into the kernel, i repeat, must not. For the vice versa, where we want passive FTP to work, but not DCC send, we do it the other way around of course, load the IRC module, but not the FTP module. What this does, is that it adds the ability to the kernel to recognize for example a passive FTP connection that is related to a currently active FTP control session, but since the IRC module is not loaded, the kernel will not know how to recognize if it's related to any currently active stream, and hence it will not allow these connections. If you do it the other way around, the opposite will be in effect.
Initiating the kernel for IP forwarding and others
After this we start the IP forwarding by echoing a 1 to /proc/sys/net/ipv4/ip_forward in this fashion :
echo "1" > /proc/sys/net/ipv4/ip_forward
In case you need dynamic IP support, for example if you use SLIP, PPP or DHCP you may enable the next option, ip_dynaddr by doing the following :
echo "1" > /proc/sys/net/ipv4/ip_dynaddr
etc, if there's any other options you might need to turn on you should follow that style, there's other documentations on how to do these things and this isn't either what this document is supposed to help you with.
Actually starting the masquerading
So, our first mission would be to get the MASQUERADEing up, correct? Well, at least to me. First of all we add a rule to the nat table, in the POSTROUTING chain that will masquerade all packets going out on our interface connected to the Internet. For me this would be eth0, -t tells us which table to use, in this case nat, -A tells us that we want to Add a new rule to an existing chain named POSTROUTING and -o eth0 tells us to match all outgoing packets on eth0 and finally we target the packet for MASQUERADE'ing. So all packets that match this rule will be masqueraded to look as it came from your Internet interface. Simple, isn't it?=)
The next step we take is to ACCEPT all packets traversing the FORWARD chain in the default table filter that come from the input interface eth1 which is my interface connecting to the internal network. All packets that are being forwarded on our box traverse the FORWARD chain in the filter table.
The next thing we do is to ACCEPT all packets from anywhere that are ESTABLISHED and/or RELATED to some connection. In other words, we first send a packet from our local box behind eth1, and since it comes from eth1 we ACCEPT it, then when the Internet box replies, it gets caught by this rule since the connection has seen packets in both directions.
The last thing we do is to log all traffic that gets dropped over the border, and hits the default policy. In some cases these might be packets that should have gotten through but didn't, in other cases it might be packets that definitely shouldn't get through and you want to be notified about this. We allow this rule to be matched a maximum of 3 times per minute with a burst limit of 3. This means we get maximally 3 log entries per minute from this specific line, and the burst is also set to 3 so if we get 3 log entries in 2 seconds, it'll have to wait for another 1 minute for the next log entry. This is good if someone starts to flood you with crap stuff that otherwise would generate many megabytes of logs. We also set a prefix to the log with the --log-prefix and set the log level with the --log-level. Log level tells the syslogd, or logging facility what kind of importance this log entry has.
Displacement of rules to different chains
I've displaced all the different chains in the fashion I've done to save as much CPU as possible but at the same time put the main weight on security. Instead of letting a TCP packet traverse ICMP, UDP and TCP rules, I just simply match all TCP packets and then let the TCP packet traverse another chain. This way we don't get too much overhead out of it all. The following picture will try and explain the basics of how an incoming packet traverses your ipfilters. This picture was pretty much stolen straight off from the packet-filtering-HOWTO.
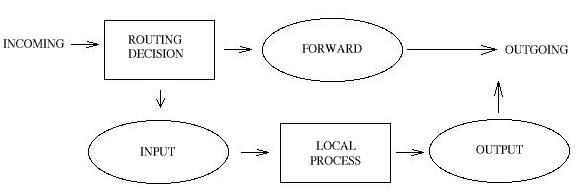
First a routing decision is made, if it's destined for your host, it's sent to INPUT, if it's destined for some box on the localnet it's sent to FORWARD. Then they traverse whichever of those chains. When and if your local box replies to the packets destined for the server, they will traverse the OUTPUT chain.
Here's pictures how they would traverse the INPUT and FORWARD and OUTPUT chains separately since the picture would be way to large if we would fit them all together in one :
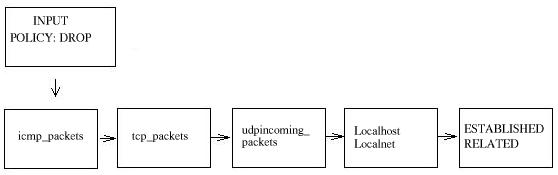
When a packet hits the INPUT chain, it will first be checked to see if it's an ICMP packet, if it is, it's sent to icmp_packets and checked if it's allowed or not. If it is, we just drop out of the INPUT chain and tell it to ACCEPT the packet. If it is not, it will reach the end of the icmp_packets chain get back to INPUT chain and reach the end with some more checks to see if it's from localhost or localnet, if it is it will be ACCEPT'ed. Finally we check to see if the packet somehow belongs to any other connection by checking if it is part of an ESTABLISHED or RELATED connection, in this case we should ACCEPT them. If it doesn't match anything, it will finally hit the chain policy which is set to DROP everything that reaches it.
If the packet would instead be a TCP packet, it would not match the rule as an ICMP packet and hence be sent to the next rule which checks for TCP packets. Since it is a TCP packet it will match and be sent to the tcp_packets chain. Here we will check if it's destined for one of the ports we'd like to allow or not, if it is, we send it on to the allowed chain to do some final checks on it. If it fails at some stage in this check, it'll be passed down to the INPUT chain and traverse the same way as the ICMP packet did.
UDP packets do the same basically, except they will traverse the udpincoming_packets chain, and if it fails to match any of the rules in there, it will be passed down to the INPUT chain and travel the same way as all the TCP and ICMP packets.
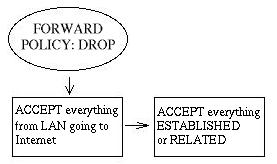
If the packet is destined to or from our local net it will be routed to the FORWARD chain. If the packet comes from our LAN we will just ACCEPT it as it is, no more, no less. If we would like to, we could only accept SYN packets, but I'm skipping that as it is now. If the packet is destined to our local net on the other hand, we only match packets in ESTABLISHED or RELATED streams since we don't want hosts from the outside to be able to establish new connections to our LAN. If none of these rules are matched the packet gets DROP'ed by our chain policy.
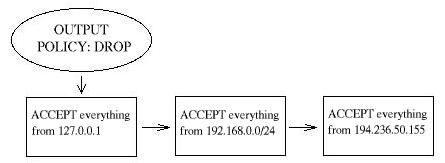
This chain is rather straight forward. We allow everything from localhost to go out, we allow everything from our own local network's ip to go out, and last of all we allow everything from our own ip to go out to the internet. You might want to just erase all this in certain cases, just dont forget to erase the default policy of the OUTPUT chain which is set to DROP everything.
Setting up the different chains used
So, now you've got a small picture how the packet traverses the different chains and how they belong together, we'll take care of setting it all up.
First of all, we set all the default policies on the different chains with a quite simple command.
iptables -P <chain name> <policy>
The default policy is used every time the packets don't match a rule in the chain. After this, we create the different special chains that we want to use with the -N command. The new chains are created and set up with no rules inside of them. The chains we will use are icmp_packets, tcp_packets, udpincoming_packets and the allowed chain for tcp_packets. Incoming packets on eth0, of ICMP type, will be redirected to the chain icmp_packets, of TCP type, will be redirected to tcp_packets and incoming packets of UDP type from eth0 go to udpincoming_packets chain.
PREROUTING chain of the nat table
The PREROUTING chain is pretty much what it says, it does filtering on packets before they actually hit the routing tables that sends them onwards to the different INPUT/FORWARD/OUTPUT chains in the filter table. This is a pretty good place to check if the packets are spoofed etc.
First of all we check for obviously spoofed IP addresses, such as in case we get packets from the Internet interface that claim to have a source IP of 192.168.x.x, 10.x.x.x or 172.16.x.x, in such case, we drop them quicker than hell since these IP's are reserved especially for local intranets and definitely shouldn't be used on the Internet. This might be used in the opposite direction, too, if we get an packet from $LAN_IFACE that claims to not come from an IP address in the $LAN_IP_RANGE, we might drop that too.
INPUT chain
The INPUT chain as I've written it uses mostly other chains to do the hard work. This way we don't get too much load from the iptables, and it will work much better on slow machines which might otherwise drop packets at high loads.
We do certain checks for bad packets here. If you want to fully understand this, you need to look at the Appendix's regarding state NEW and non-SYN packets getting through other rules. These packets could be allowed under certain circumstances but in 99% of the cases we wouldn't want these packets to get through. Hence, we log them to our logs and then we DROP them.
First of all we match all ICMP packets in the INPUT chain that come on the incoming interface $INET_IFACE, which in my case is eth0, and send those to the icmp_packets, which was previously described. After this, we do the same match for TCP packets on the $INET_IFACE and send those to the tcp_packets chain, and after this all UDP packets get sent to udpincoming_packets chain.
Finally, we check for everything that comes from our $LOCALHOST_IP, which would normally be 127.0.0.1 and ACCEPT all incoming traffic from there, do the same for everything from $LAN_IP_RANGE, which in my case would be 192.168.0.0/24, and after this, something that some might consider a security problem, I allow everything that comes from my own Internet IP that is either ESTABLISHED or RELATED to some connection. Also, we allow broadcast traffic from our LAN, some applications depend on it such as Samba etc. These applications will not work properly without it.
Before we hit the default policy of the INPUT chain, we log it so we might be able to find out about possible problems and or bugs. Either it might be a packet that we just dont want to allow or it might be someone who's doing something bad to us, or finally it might be a problem in our firewall not allowing traffic that should be allowed. In either case we want to know about it so it can be dealt with. Though, we don't log more than 3 packets per minute as to not getting flooded with crap all over the log files, also we set a prefix to all log entries so we know where it came from.
Everything that hasn't yet been caught will be DROP'ed by the default policy on the INPUT chain. The default policy was set quite some time back, as you might remember.
The TCP allowed chain
If a packet comes in on eth0 and is of TCP type, it travels through the tcp_packets chain, if the connection is against an allowed port, we want to do some final checks on it to see if we actually do want to allow it or not.
First of all, we create the chain the same way as all the others. After that, we check if the packet is a SYN packet. If it is a SYN packet, it is most likely to be the first packet in a new connection so, of course, we allow this. Then we check if the packet comes from an ESTABLISHED or RELATED connection, if it does, then we, again of course, allow it. An ESTABLISHED connection is a connection that has seen traffic in both directions, and since we've got a SYN packet, and a reply to this SYN packet, the connection then must be in state ESTABLISHED. The last rule in this chain will DROP everything else. In this case this pretty much means everything that hasn't seen traffic in both directions, ie, we didn't reply to the SYN packet, or they are trying to start the connection with a non SYN packet. There is no practical use of not starting a connection with a SYN packet, except to portscan people pretty much. There is no currently available TCP/IP implementation that supports opening a TCP connection with something else than a SYN packet to my knowledge, hence, DROP the crap since it's 99% sure to be a portscan.
ICMPchain
This is where we decide what ICMP types to allow. If a packet of ICMP type comes in on eth0 on the INPUT chain, we then redirect it to the icmp_packets chain as explained before. Here we check what kind of ICMP types to allow. As it is now, I only allow incoming ICMP Echo Replies, Destination unreachable, Redirect and Time Exceeded.
The reason that I allow these ICMP packets are as follows, Echo Replies is what you get for example when you ping another host, if we don't allow this, we will be unable to ping other hosts.
Destination Unreachable is used if a certain host is unreachable, so for example if we send a HTTP request, and the host is unreachable, the last gateway that was unable to find the route to the host replies with a Destination Unreachable telling us that it was unable to find it. This way we won't have to wait until the browser's timeouts kicks in after some 60 seconds or more.
Redirect, I allow since I might not use the best route to a host, for example if i send a packet to Gateway 1(G1) which is on the same network segment as Gateway 2(G2), and G1 sends the packet on to G2, G2 might tell you to use G2 instead of G1 as to get rid of one of the hops. We might sometimes get a faster transfer this way, not much but a little at least.
Time Exceeded, is allowed in the case where we might want to traceroute some host or if a packet gets its Time To Live set to 0, we will get a reply about this. For example, when you traceroute someone, you start out with TTL = 1, and it gets down to 0 at the first hop on the way out, and a Time Exceeded is sent back from the first gateway en route to the host we're trying to traceroute, then TTL = 2 and the second gateway sends Time Exceeded, and so on until we get an actual reply from the host we finally want to get to.
Here's a complete list of ICMP types:
| TYPE | CODE | Description | Query | Error |
|---|---|---|---|---|
| 0 | 0 | Echo Reply | x | |
| 3 | 0 | Network Unreachable | x | |
| 3 | 1 | Host Unreachable | ||
| 3 | 2 | Protocol Unreachable | ||
| 3 | 3 | Port Unreachable | ||
| 3 | 4 | Fragmentation needed but no frag. bit set | ||
| 3 | 5 | Source routing failed | ||
| 3 | 6 | Destination network unknown | ||
| 3 | 7 | Destination host unknown | ||
| 3 | 8 | Source host isolated (obsolete) | ||
| 3 | 9 | Destination network administratively prohibited | ||
| 3 | 10 | Destination host administratively prohibited | ||
| 3 | 11 | Network unreachable for TOS | ||
| 3 | 12 | Host unreachable for TOS | ||
| 3 | 13 | Communication administratively prohibited by filtering | ||
| 3 | 14 | Host precedence violation | ||
| 3 | 15 | Precedence cutoff in effect | ||
| 4 | 0 | Source quelch | ||
| 5 | 0 | Redirect for network | ||
| 5 | 1 | Redirect for host | ||
| 5 | 2 | Redirect for TOS and network | ||
| 5 | 3 | Redirect for TOS and host | ||
| 8 | 0 | Echo request | x | |
| 9 | 0 | Router advertisement | ||
| 10 | 0 | Route sollicitation | ||
| 11 | 0 | TTL equals 0 during transit | x | |
| 11 | 1 | TTL equals 0 during reassembly | ||
| 12 | 0 | IP header bad (catchall error) | ||
| 12 | 1 | Required options missing | ||
| 13 | 0 | Timestamp request (obsolete) | ||
| 14 | 0 | Timestamp reply (obsolete) | ||
| 15 | 0 | Information request (obsolete) | ||
| 16 | 0 | Information reply (obsolete) | ||
| 17 | 0 | Address mask request | ||
| 18 | 0 | Address mask reply |
For more information on this, i suggest reading the following sites and reports :
As a side-note, I might be wrong in blocking some of these things for you, but in my case, everything's working perfectly while blocking all the other ICMP types that I don't allow.
TCP chain
So, TCP connections. This specifies what ports that are allowed to use on the firewall from the Internet. Though, there is still more checks to do, hence we send each and one of them on to allowed chain, which we described previously.
A tcp_packets tells iptables in which chain to add the new rule, the rule will be added to the end of the chain. -p TCP tells it to match TCP packets and -s 0/0 matches all source addresses from 0.0.0.0 with netmask 0.0.0.0, in other words all sources addresses, this is actually the default behaviour but I'm using it for brevity in here. --dport 21 means destination port 21, in other words if the packet is destined for port 21 they also match. If all the criteria are matched, then the packet will be targeted for the allowed chain. If it doesn't match any of the rules, they will be passed back to the original chain that sent the packet to the tcp_packets chain.
As it is now, I allow TCP port 21, or FTP control port, which is used to control FTP connections and later on I also allow all RELATED connections, and that way we allow PASSIVE and PORT connections since the ip_conntrack_ftp module is, hopefully, loaded. If we just don't want to allow FTP at all, we can unload the ip_conntrack_ftp module and delete that line from the rc.firewall file.
Port 22 is SSH, much better than allowing telnet on port 23, if you want to allow anyone from the outside to use a shell on your box at all.
Port 80 is HTTP, in other words your web server, delete it if you don't want to run a web server on your site.
And finally we allow port 113, which is IDENTD and might be necessary for some protocols like IRC, etc to work properly.
If you feel like adding more open ports with this script, well, its quite self explanatory how to do that by now=).
UDP chain
Currently, if we get a UDP packet on the INPUT chain, we send them on to the udpincoming_packets.
Currently, if we do get a UDP packet on the INPUT chain, we send them on to udpincoming_packets where we once again do a match for the UDP protocol with -p UDP and then match everything with a source address of 0.0.0.0 and netmask 0.0.0.0, in other words everything again. If they have a source port of 53 also, we ACCEPT them directly.
As it is now, I ACCEPT incoming UDP packets from port 53, which is what we use to do DNS lookups, without this we wouldn't be able to do domain name lookups and we would be reversed to only use IP's. We don't want this behaviour, hence we allow DNS, of course.
I personally also allow port 123, which is NTP or network time protocol. This protocol is used to set your computer clock to the same time as certain other time servers which have very accurate clocks. Though, most of you probably don't use this protocol, I'm allowing it per default since I know there are some who actually do.
We currently also allow port 2074, which is used for certain real-time `multimedia' applications like speak freely which you can use to talk to other people in real-time by using speakers and a microphone, or even better, a headset.
Port 4000, well, it should be quite well known by now, it's the ICQ protocol. I doubt there's any further need to explain what it is.
OUTPUT chain
Since i know that there's pretty much no one but me using this box which is partially used as a Firewall and a workstation currently, I allow pretty much everything that goes out from it that has a source address $LOCALHOST_IP, $LAN_IP or $STATIC_IP. Everything else might be spoofed in some fashion, even though I doubt anyone that I know would do it on my box. Last of all we log everything that gets dropped. If it does get dropped, we'll sure as hell want to know about it for some reason or another. Either it's a nasty error, or it's a weird packet that's spoofed. Finally we DROP the packet in the default policy.
FORWARD chain
Even though I haven't actually set up a certain section in the rc.firewall example file, I would like to comment on the few lines in there anyways. As it is now, we first of all ACCEPT all packets coming from our LAN with the following line :
/usr/local/sbin/iptables -A FORWARD -i $LAN_IFACE -j ACCEPT
So everything from our Localnet's interface gets ACCEPT'ed whatever the circumstances. After this we allow everything in a state ESTABLISHED or RELATED from everywhere, in other words, if we open a connection from our LAN to something on the Internet, we allow the packets coming back from that site that's either ESTABLISHED or RELATED but nothing else. And after this we log everything and drop it. We log maximally 3 log entries per minute as to not flood our own logs, and prefix them with a short line that is possible to grep for in the logfiles. Also we log them with debug level. We finally hit the default policy of the FORWARD chain that says to DROP everything.
Example scripts
rc.firewall.txt
This is the script that the whole tutorial bases its text on. To find the script go here, rc.firewall.txt. In other words I hope I won't have to write very much about it. Mainly it was written for a two way homed network. For example, where you have one LAN and one Internet Connection. This script also makes the assumption that you have a static IP to the Internet, and hence don't use DHCP, PPP, SLIP or some other protocol that assigns you an IP.
rc.DMZ.firewall.txt
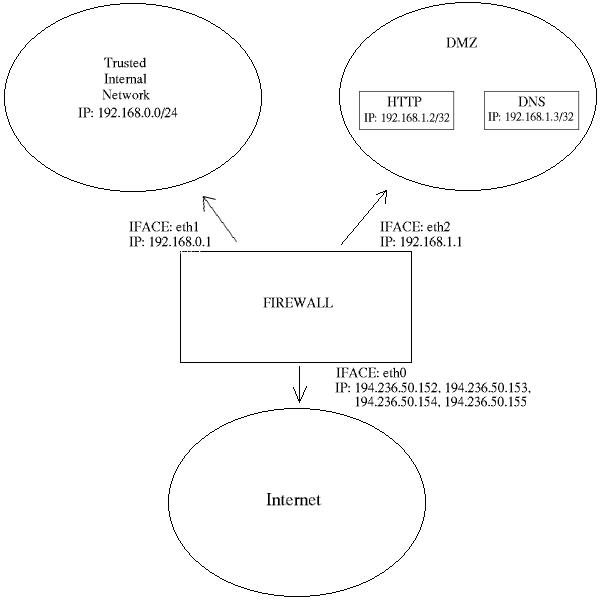
You will find this script at the following place URL, rc.DMZ.firewall.txt. This script was written for those people out there that has one trusted internal network, one De-Militarized Zone and one Internet connection. The De-Militarized Zone is in this case 1-to-1 NAT'ed and requires you to do some IP aliasing on your firewall, ie, you must make the box recognise packets for more than one IP. In the future you will find examples on how to do IP aliasing in this tutorial, for now, you won't get any practical examples though.
You need to have 2 internal networks with this script as you can see from the picture. One uses IP range 192.168.0.0/24 and consists of a Trusted Internal Network. The other one uses IP range 192.168.1.0/24 and consists of the De-Militarized Zone which we will do 1-to-1 NAT to. If someone from the internet sends a packet to our DNS_IP, then we use DNAT, which stands for Destination Network Adress Translation, to send the packet on to our DNS on the DMZ. When the DNS sees our packet, the packet will destined for the actual DNS internal network IP, and not for our external DNS IP. If the packet wouldn't have been translated, the DNS wouldn't have answered the packet. We will show a short example of how the DNAT code looks:
$IPTABLES -t nat -A PREROUTING -p TCP -i $INET_IFACE -d $DNS_IP --dport 53 -j DNAT --to-destination $DMZ_DNS_IP
First of all, DNAT can only be performed in the PREROUTING chain of the nat table. Then we look for TCP protocol on our $INET_IFACE with destination IP that matches our $DNS_IP, and is directed to port 53, which is the TCP port for zone transfers in DNS's. If we actually get such a packet we give a target of DNAT, in other words Destination NAT. After that we specify where we want the packet to go with the --to-destination option and give it the value of $DMZ_DNS_IP, in other words the IP of the DNS on our DMZ. This is how basic DNAT works. When the reply to the DNAT'ed packet is sent through the firewall, it automatically gets un-DNAT'ed.
By now you should have enough understanding of how everything works to be able to understand this script pretty well without any huge complications. If there is something you don't understand, that hasn't been gone through in the rest of the tutorial, mail me since It's probably a fault on my side.
rc.DHCP.firewall.txt
This script is pretty much identical to the original rc.firewall.txt. You will find this script here. However, this script no longer uses the STATIC_IP variable. The reason is that this won't work together with a dynamic IP connection. The actual changes needed to be done to the original script is minimal, however, I've had some people mail me and ask about the problem so this script will be a good solution for you. This script will allow people who uses DHCP, PPP and SLIP connections to connect to the internet.
The main changes done to the script consists of erasing the STATIC_IP variable as I already said and deleting all referenses to this variable. Instead of using this variable the script now does it's main filtering on the variable INET_IFACE. In other words -d $STATIC_IP has been changed to -i $INET_IFACE. This is pretty much the only changes made and that's all that's needed really.
NOTE: This script might be a bit less secure than the rc.firewall.txt script. I would definitely advise you to use that script if at all possible since this script is more open.
rc.flush-iptables.txt
This script should not really be called a script in itself. However, you'll find it here. The script will reset and flush all your tables and chains. The script starts by setting the default policies to ACCEPT on the INPUT, OUTPUT and FORWARD chains of the filter table. After this we reset the default policies of the PREROUTING, POSTROUTING and OUTPUT chains of the NAT table. We do this first so we won't have to bother about closed connections and packets not getting through. This script is intended for actually setting up and troubleshooting your firewall, and hence we only care about opening the whole thing up and reset it to default values.
After this we flush all chains first in the filter table and then in the NAT table. This way we know there is no redundant rules lying around anywhere. When all of this is done, we jump down to the next section where we erase all the user specified chains in the NAT and filter tables. When this is done, we concider ourself done. You might consider adding rules to flush your MANGLE table in certain cases though, especially if you use it.
One final word on this issue. Certain people has mailed me asking from me to put this script into the original rc.firewall script using redhat Linux syntax where you type something like rc.firewall start and the script starts. However, I will not do that since this is a tutorial and should be used as a place to fetch ideas mainly and it shouldn't be filled up with shell scripts and strange syntax. Adding shell script syntax and other things makes the script harder to read as far as I am concerned and the tutorial was written with readability in mind and will continue being so.
Passive FTP but no DCC
This is one of the really nice parts about the new iptables support in the 2.4.x kernels, you can for example allow Passive FTP connections, but not allow DCC send functions with the new state matching code. You may ask yourself how, well, its quite simple once you get to think of it=). Just compile the ip_conntrack_irc and ip_conntrack_ftp modules in the kernel. What these modules does is that they add support to the conntrack module so it can distinguish a passive FTP connection or a DCC send connection, without these modules they can't recognize these connections. If you for example want to allow passive FTP, but not DCC send, you would load the ip_conntrack_ftp module, but not the ip_conntrack_irc module and then do :
/usr/local/sbin/iptables -A INPUT -p TCP -m state --state RELATED -j ACCEPT
To allow passive FTP but not DCC. If you would want to do the reverse, you'd just load the ip_conntrack_irc module, but not the ip_conntrack_ftp module.
State NEW packets but no SYN bit set
There is a certain "feature" in iptables that is not so well documented and may therefore be overlooked by a lot of people(yes, including me). If you use state NEW, packets with the SYN bit unset will get through your firewall. This feature is there because in certain cases we wan't to consider that a packet may be part of an already ESTABLISHED connection on, for instance, another firewall. This feature makes it possible to have two or more firewalls, and the main firewall goes down. The firewalling of this subnet would then be taken over by our secondary firewall, and state NEW will therefore allow pretty much any kind of TCP connection, regardless if this is the actual 3-way handshake or not. To take care of this problem we add the following rules to our firewalls INPUT, OUTPUT and FORWARD chain:
$IPTABLES -A INPUT -p tcp !
--syn -m state --state NEW -j LOG --log-prefix "New not syn:"
$IPTABLES -A INPUT -p tcp ! --syn -m state --state NEW
-j DROP
The above rules will take care of this problem. This is a badly documented problem of the netfilter/iptables project and should definitely be more highlighted. In other words, a huge warning is at it's place for this kind of behaviour on your firewall.
ISP's who use assigned IP's
I've added this since a friend of mine told me something i've totally forgotten, certain stupid ISP's use IP's assigned by IANA for their own local networks. For example, the swedish ISP and phone monopoly Telia uses this approach for example on their DNS servers, which uses the 10.x.x.x IP range. The problem you'll most probably run into is that we, in this script, don't allow connections from any IP's in the 10.x.x.x range to us, because of spoofing possibilities. Well, here's unfortunately an example where you actually might have to lift a bit on those rules. You might just insert an ACCEPT rule above the spoof section to allow traffic from those DNS servers, or you could just comment out that part of the script. This is how it might look :
/usr/local/sbin/iptables -t nat -I PREROUTING -i eth1 -s 10.0.0.1/32 -j ACCEPT
I'd like to take my moment to bitch at these ISP's. These ranges are not assigned for you to use for dumb stuff like this, at least not to my knowledge, for large corporate sites it's more than ok, or your own home network, but you're not supposed to force us to open up ourself just because of some whince of yours.
Updating and flushing your tables
If at some point you screw up your iptables, there are actually commands to flush them, so you don't have to reboot. I've actually gotten this question a couple times by now so I thought I'd answer it right here. If you added a rule in error, you might just change the -A parameter to -D in the line you added in error. iptables will find the erroneous line and erase it for you, in case you've got multiple lines looking exactly the same in the chain, it erases the first instance it finds matching your rule. If this is not the wanted behaviour you might try to use the -D option as iptables -D INPUT 10 which will erase the 10th rule in the INPUT chain.
There is also instances where you want to flush a whole chain, in this case you might want to run the -F option. For example, iptables -F INPUT will erase the whole INPUT chain, though, this will not change the default policy, so if this is set to DROP you'll block the whole INPUT chain if used as above. To reset the chain policy, do as how you set it to DROP, for example iptables -P INPUT ACCEPT.
I've made a small script (available as an appendix as well) that will flush and reset your iptables that you might consider using while setting up your rc.firewall file properly. One thing though, if you start mucking around in the mangle table, this script will not erase those, it's rather simple to add the few lines needed to erase those but i've not added those here since the mangle table is not used in my rc.firewall script so far.
Other resources and links
Here's a list of links to resources and where i've gotten information from etc :
- http://ods.dyndns.org/ipt_flow.html
- system control via /proc etc
- The official site of iptables and netfilter
- The official netfilter FAQ
- Rusty's Unreliable Guide to packet filtering
- Rusty's Unreliable Guide to Network Address Translation
- Rusty's Unreliable Netfilter Hacking HOWTO
- Netfilter user mailing-list
And of course the iptables source, documentation and individuals who helped me.
Contributers
The following people I'd like to thank for the help on this document :
- Fabrice Marie, For major updates to my horrible grammar and spelling. Also a huge thanks for updating the tutorial to DocBook format with make files etc.
- Marc Boucher, For helping me out on some aspects on using the state matching code.
- Frode E. Nyboe, For greatly improving the rc.firewall rules and giving great inspiration while i was to rewrite the ruleset and being the one who introduced the multiple table traversing into the same file.
- Chapman Brad, Alexander W. Janssen, Both for making me realize I was thinking wrong about how packets traverse the basic NAT and filters tables and in which order they show up.
- Michiel Brandenburg, Myles Uyema, For helping me out with some of the state matching code and getting it to work.
- Kent `Artech' Stahre, For helping me out with the graphics. I know I suck at graphics, and you're better than most I know who do graphics;). Also thanks for checking the tutorial for errors etc.
- Jeremy `Spliffy' Smith, For giving me hints at stuff that might screw up for people and for trying it out and checking for errors in what I've written.
And of course everyone else I talked to and asked for comments on this file, sorry for not mentioning everyone.
Example rc.firewall script
#!/bin/sh
#
# rc.firewall - Initial SIMPLE IP Firewall test script for 2.4.x
#
# Author: Oskar Andreasson <blueflux@koffein.net>
# (c) of BoingWorld.com, use at your own risk, do whatever you please with
# it as long as you don't distribute this without due credits to
# BoingWorld.com
#
###########
# Configuration options, these will speed you up getting this script to
# work with your own setup.
#
# your LAN's IP range and localhost IP. /24 means to only use the first 24
# bits of the 32 bit IP adress. the same as netmask 255.255.255.0
#
# STATIC_IP is used by me to allow myself to do anything to myself, might
# be a security risc but sometimes I want this. If you don't have a static
# IP, I suggest not using this option at all for now but it's stil
# enabled per default and will add some really nifty security bugs for all
# those who skips reading the documentation=)
LAN_IP_RANGE="192.168.0.0/24"
LAN_IP="192.168.0.2/32"
LAN_BCAST_ADRESS="192.168.0.255/32"
LOCALHOST_IP="127.0.0.1/32"
STATIC_IP="194.236.50.155/32"
INET_IFACE="eth0"
LAN_IFACE="eth1"
IPTABLES="/usr/local/sbin/iptables"
#########
# Load all required IPTables modules
#
#
# Needed to initially load modules
#
/sbin/depmod -a
#
# Adds some iptables targets like LOG, REJECT and MASQUARADE.
#
/sbin/modprobe ipt_LOG
#/sbin/modprobe ipt_REJECT
/sbin/modprobe ipt_MASQUERADE
#
# Support for owner matching
#
#/sbin/modprobe ipt_owner
#
# Support for connection tracking of FTP and IRC.
#
#/sbin/modprobe ip_conntrack_ftp
#/sbin/modprobe ip_conntrack_irc
#
# Enable ip_forward, this is critical since it is turned off as defaul in Linux.
#
echo "1" > /proc/sys/net/ipv4/ip_forward
#
# Dynamic IP users:
#
#echo "1" > /proc/sys/net/ipv4/ip_dynaddr
#
# Enable simple IP Forwarding and Network Address Translation
#
$IPTABLES -t nat -A POSTROUTING -o $INET_IFACE -j SNAT --to-source $STATIC_IP
#
# Bad TCP packets we don't want
#
$IPTABLES -A FORWARD -p tcp ! --syn -m state --state NEW -j LOG --log-prefix "New not syn:"
$IPTABLES -A FORWARD -p tcp ! --syn -m state --state NEW -j DROP
#
# Accept the packets we actually want to forward
#
$IPTABLES -A FORWARD -i $LAN_IFACE -j ACCEPT
$IPTABLES -A FORWARD -m state --state ESTABLISHED,RELATED -j ACCEPT
$IPTABLES -A FORWARD -m limit --limit 3/minute --limit-burst 3 -j LOG --log-level DEBUG --log-prefix "IPT FORWARD packet died: "
#
# Set default policies for the INPUT, FORWARD and OUTPUT chains
#
$IPTABLES -P INPUT DROP
$IPTABLES -P OUTPUT DROP
$IPTABLES -P FORWARD DROP
#
# Create separate chains for ICMP, TCP and UDP to traverse
#
$IPTABLES -N icmp_packets
$IPTABLES -N tcp_packets
$IPTABLES -N udpincoming_packets
#
# The allowed chain for TCP connections
#
$IPTABLES -N allowed
$IPTABLES -A allowed -p TCP --syn -j ACCEPT
$IPTABLES -A allowed -p TCP -m state --state ESTABLISHED,RELATED -j ACCEPT
$IPTABLES -A allowed -p TCP -j DROP
#
# ICMP rules
#
$IPTABLES -A icmp_packets -p ICMP -s 0/0 --icmp-type 0 -j ACCEPT
$IPTABLES -A icmp_packets -p ICMP -s 0/0 --icmp-type 3 -j ACCEPT
$IPTABLES -A icmp_packets -p ICMP -s 0/0 --icmp-type 5 -j ACCEPT
$IPTABLES -A icmp_packets -p ICMP -s 0/0 --icmp-type 11 -j ACCEPT
#
# TCP rules
#
$IPTABLES -A tcp_packets -p TCP -s 0/0 --dport 21 -j allowed
$IPTABLES -A tcp_packets -p TCP -s 0/0 --dport 22 -j allowed
$IPTABLES -A tcp_packets -p TCP -s 0/0 --dport 80 -j allowed
$IPTABLES -A tcp_packets -p TCP -s 0/0 --dport 113 -j allowed
#
# UDP ports
#
$IPTABLES -A udpincoming_packets -p UDP -s 0/0 --source-port 53 -j ACCEPT
$IPTABLES -A udpincoming_packets -p UDP -s 0/0 --source-port 123 -j ACCEPT
$IPTABLES -A udpincoming_packets -p UDP -s 0/0 --source-port 2074 -j ACCEPT
$IPTABLES -A udpincoming_packets -p UDP -s 0/0 --source-port 4000 -j ACCEPT
#
# PREROUTING chain.
#
# Do some checks for obviously spoofed IP's
#
$IPTABLES -t nat -A PREROUTING -i $INET_IFACE -s 192.168.0.0/16 -j DROP
$IPTABLES -t nat -A PREROUTING -i $INET_IFACE -s 10.0.0.0/8 -j DROP
$IPTABLES -t nat -A PREROUTING -i $INET_IFACE -s 172.16.0.0/12 -j DROP
#
# INPUT chain
#
# Take care of bad TCP packets that we don't want
#
$IPTABLES -A INPUT -p tcp ! --syn -m state --state NEW -j LOG --log-prefix "New not syn:"
$IPTABLES -A INPUT -p tcp ! --syn -m state --state NEW -j DROP
#
# Rules for incoming packets from the internet
#
$IPTABLES -A INPUT -p ICMP -i $INET_IFACE -j icmp_packets
$IPTABLES -A INPUT -p TCP -i $INET_IFACE -j tcp_packets
$IPTABLES -A INPUT -p UDP -i $INET_IFACE -j udpincoming_packets
#
# Rules for special networks not part of the Internet
#
$IPTABLES -A INPUT -p ALL -i $LAN_IFACE -d $LAN_BCAST_ADRESS -j ACCEPT
$IPTABLES -A INPUT -p ALL -i $LO_IFACE -d $LOCALHOST_IP -j ACCEPT
$IPTABLES -A INPUT -p ALL -i $LAN_IFACE -d $LAN_IP -j ACCEPT
$IPTABLES -A INPUT -p ALL -d $STATIC_IP -m state --state ESTABLISHED,RELATED -j ACCEPT
$IPTABLES -A INPUT -m limit --limit 3/minute --limit-burst 3 -j LOG --log-level DEBUG --log-prefix "IPT INPUT packet died: "
#
# OUTPUT chain
#
$IPTABLES -A OUTPUT -p tcp ! --syn -m state --state NEW -j LOG --log-prefix "New not syn:"
$IPTABLES -A OUTPUT -p tcp ! --syn -m state --state NEW -j DROP
$IPTABLES -A OUTPUT -p ALL -s $LOCALHOST_IP -j ACCEPT
$IPTABLES -A OUTPUT -p ALL -s $LAN_IP -j ACCEPT
$IPTABLES -A OUTPUT -p ALL -s $STATIC_IP -j ACCEPT
$IPTABLES -A OUTPUT -m limit --limit 3/minute --limit-burst 3 -j LOG --log-level DEBUG --log-prefix "IPT OUTPUT packet died: "
Example rc.DMZ.firewall script
#!/bin/sh
#
# rc.DMZ.firewall - DMZ IP Firewall script for Linux 2.4.x
#
# Author: Oskar Andreasson <blueflux@koffein.net>
# (c) of BoingWorld.com, use at your own risk, do whatever you please with
# it as long as you don't distribute this without due credits to
# BoingWorld.com
#
###########
# Configuration options, these will speed you up getting this script to
# work with your own setup.
#
# your LAN's IP range and localhost IP. /24 means to only use the first 24
# bits of the 32 bit IP adress. the same as netmask 255.255.255.0
#
# STATIC_IP is used by me to allow myself to do anything to myself, might
# be a security risc but sometimes I want this. If you don't have a static
# IP, I suggest not using this option at all for now but it's stil
# enabled per default and will add some really nifty security bugs for all
# those who skips reading the documentation=)
LAN_IP_RANGE="192.168.0.0/24"
LAN_IP="192.168.0.2/32"
LAN_BCAST_ADRESS="192.168.0.255/32"
LAN_IFACE="eth1"
INET_IP="194.236.50.152/32"
INET_IFACE="eth0"
HTTP_IP="194.236.50.153/32"
DNS_IP="194.236.50.154/32"
DMZ_HTTP_IP="192.168.1.2/32"
DMZ_DNS_IP="192.168.1.3/32"
DMZ_IP="192.168.1.1/32"
DMZ_IFACE="eth2"
LO_IP="127.0.0.1/32"
LO_IFACE="127.0.0.1/32"
IPTABLES="/usr/local/sbin/iptables"
###########################################
#
# Load all required IPTables modules
#
#
# Needed to initially load modules
#
/sbin/depmod -a
#
# Adds some iptables targets like LOG, REJECT and MASQUARADE.
#
/sbin/modprobe ipt_LOG
/sbin/modprobe ipt_MASQUERADE
#
# Support for connection tracking of FTP and IRC.
#
#/sbin/modprobe ip_conntrack_ftp
#/sbin/modprobe ip_conntrack_irc
#CRITICAL: Enable IP forwarding since it is disabled by default.
#
echo "1" > /proc/sys/net/ipv4/ip_forward
#
# Dynamic IP users:
#
#echo "1" > /proc/sys/net/ipv4/ip_dynaddr
###########################################
#
# Chain Policies gets set up before any bad packets gets through
#
$IPTABLES -P INPUT DROP
$IPTABLES -P OUTPUT DROP
$IPTABLES -P FORWARD DROP
#
# the allowed chain for TCP connections, utilized in the FORWARD chain
#
$IPTABLES -N allowed
$IPTABLES -A allowed -p TCP --syn -j ACCEPT
$IPTABLES -A allowed -p TCP -m state --state ESTABLISHED,RELATED -j ACCEPT
$IPTABLES -A allowed -p TCP -j DROP
#
# ICMP rules, utilized in the FORWARD chain
#
$IPTABLES -N icmp_packets
$IPTABLES -A icmp_packets -p ICMP -s 0/0 --icmp-type 0 -j ACCEPT
$IPTABLES -A icmp_packets -p ICMP -s 0/0 --icmp-type 3 -j ACCEPT
$IPTABLES -A icmp_packets -p ICMP -s 0/0 --icmp-type 5 -j ACCEPT
$IPTABLES -A icmp_packets -p ICMP -s 0/0 --icmp-type 11 -j ACCEPT
###########################################
# POSTROUTING chain in the nat table
#
# Enable IP SNAT for all internal networks trying to get out on the Internet
#
$IPTABLES -t nat -A POSTROUTING -o $INET_IFACE -j SNAT --to-source $INET_IP
$IPTABLES -t nat -A POSTROUTING -i $LAN_IFACE -o $DMZ_IFACE -j ACCEPT
$IPTABLES -t nat -A POSTROUTING -i $DMZ_IFACE -o $LAN_IFACE -j ACCEPT
###########################################
# PREROUTING chain in the nat table
#
# Do some checks for obviously spoofed IP's
#
$IPTABLES -t nat -A PREROUTING -i $INET_IFACE -s 192.168.0.0/16 -j DROP
$IPTABLES -t nat -A PREROUTING -i $INET_IFACE -s 10.0.0.0/8 -j DROP
$IPTABLES -t nat -A PREROUTING -i $INET_IFACE -s 172.16.0.0/12 -j DROP
$IPTABLES -t nat -A PREROUTING -i $INET_IFACE -s $INET_IP -j DROP
#
# Enable IP Destination NAT for DMZ zone
#
$IPTABLES -t nat -A PREROUTING -p TCP -i $INET_IFACE -d $HTTP_IP --dport 80 -j DNAT --to-destination $DMZ_HTTP_IP
$IPTABLES -t nat -A PREROUTING -p TCP -i $INET_IFACE -d $DNS_IP --dport 53 -j DNAT --to-destination $DMZ_DNS_IP
$IPTABLES -t nat -A PREROUTING -p UDP -i $INET_IFACE -d $DNS_IP --dport 53 -j DNAT --to-destination $DMZ_DNS_IP
###########################################
#
# FORWARD chain
#
# Get rid of bad TCP packets
#
$IPTABLES -A FORWARD -p tcp ! --syn -m state --state NEW -j LOG --log-prefix "New not syn:"
$IPTABLES -A FORWARD -p tcp ! --syn -m state --state NEW -j DROP
#
# DMZ section
#
# General rules
#
$IPTABLES -A FORWARD -i $DMZ_IFACE -o $INET_IFACE -j ACCEPT
$IPTABLES -A FORWARD -i $INET_IFACE -o $DMZ_IFACE -m state --state ESTABLISHED,RELATED -j ACCEPTED
$IPTABLES -A FORWARD -i $LAN_IFACE -o $DMZ_IFACE -j ACCEPT
$IPTABLES -A FORWARD -i $DMZ_IFACE -o $LAN_IFACE -j ACCEPT
#
# HTTP server
#
$IPTABLES -A FORWARD -p TCP -i $INET_IFACE -o $DMZ_IFACE -d $DMZ_HTTP_IP --dport 80 -j allowed
$IPTABLES -A FORWARD -p ICMP -i $INET_IFACE -o $DMZ_IFACE -d DMZ_HTTP_IP -j icmp_packets
#
# DNS server
#
$IPTABLES -A FORWARD -p TCP -i $INET_IFACE -o $DMZ_IFACE -d $DMZ_DNS_IP --dport 53 -j allowed
$IPTABLES -A FORWARD -p UDP -i $INET_IFACE -o $DMZ_IFACE -d $DMZ_DNS_IP --dport 53 -j ACCEPT
$IPTABLES -A FORWARD -p ICMP -i $INET_IFACE -o $DMZ_IFACE -d $DMZ_DNS_IP -j icmp_packets
#
# LAN section
#
$IPTABLES -A FORWARD -i $LAN_IFACE -j ACCEPT
$IPTABLES -A FORWARD -m state --state ESTABLISHED,RELATED -j ACCEPT
#
# LOG all packets reaching here
#
$IPTABLES -A FORWARD -m limit --limit 3/minute --limit-burst 3 -j LOG --log-level DEBUG --log-prefix "IPT FORWARD packet died: "
###########################################################
#
# Firewall rules
# Rules applying to the firewall box
#
#
# INPUT chain
#
# Get rid of bad packets
#
$IPTABLES -A FORWARD -p tcp ! --syn -m state --state NEW -j LOG --log-prefix "New not syn:"
$IPTABLES -A FORWARD -p tcp ! --syn -m state --state NEW -j DROP
#
# Packets from the Internet to this box
#
$IPTABLES -A INPUT -p ICMP -i $INET_IFACE -j icmp_packets
#
# Packets from LAN, DMZ or LOCALHOST
#
# From DMZ Interface to DMZ firewall IP
$IPTABLES -A INPUT -p ALL -i $DMZ_IFACE -d $DMZ_IP -j ACCEPT
# From LAN Interface to LAN firewall IP
$IPTABLES -A INPUT -p ALL -i $LAN_IFACE -d $LAN_IP -j ACCEPT
$IPTABLES -A INPUT -p ALL -i $LAN_IFACE -d $LAN_BCAST_ADRESS -j ACCEPT
# From Localhost interface to Localhost IP
$IPTABLES -A INPUT -p ALL -i $LO_IFACE -d $LO_IP -j ACCEPT
# All established and related packets incoming from the internet to the firewall
$IPTABLES -A INPUT -p ALL -d $INET_IP -m state --state ESTABLISHED,RELATED -j ACCEPT
# Logging rule
$IPTABLES -A INPUT -m limit --limit 3/minute --limit-burst 3 -j LOG --log-level DEBUG --log-prefix "IPT INPUT packet died: "
###########################################################
#
# OUTPUT chain
#
#
# Get rid of bad TCP packets
#
$IPTABLES -A FORWARD -p tcp ! --syn -m state --state NEW -j LOG --log-prefix "New not syn:"
$IPTABLES -A FORWARD -p tcp ! --syn -m state --state NEW -j DROP
#
# Allow ourself to send packets not spoofed everywhere
#
$IPTABLES -A OUTPUT -p ALL -d $LO_IFACE -s $LO_IP -j ACCEPT
$IPTABLES -A OUTPUT -p ALL -d $LAN_IP-s $LAN_IP -j ACCEPT
$IPTABLES -A OUTPUT -p ALL -d $INET_IFACE -s $INET_IP -j ACCEPT
#
# Logging rule
#
$IPTABLES -A OUTPUT -m limit --limit 3/minute --limit-burst 3 -j LOG --log-level DEBUG --log-prefix "IPT OUTPUT packet died: "
Example rc.DHCP.firewall script
#!/bin/sh
#
# rc.firewall - DHCP IP Firewall script for 2.4.x
#
# Author: Oskar Andreasson <blueflux@koffein.net>
# (c) of BoingWorld.com, use at your own risk, do whatever you please with
# it as long as you don't distribute this without due credits to
# BoingWorld.com
#
###########
# Configuration options, these will speed you up getting this script to
# work with your own setup.
#
# your LAN's IP range and localhost IP. /24 means to only use the first 24
# bits of the 32 bit IP adress. the same as netmask 255.255.255.0
#
LAN_IP_RANGE="192.168.0.0/24"
LAN_IP="192.168.0.2/32"
LAN_BCAST_ADRESS="192.168.0.255/32"
LOCALHOST_IP="127.0.0.1/32"
INET_IFACE="eth0"
LAN_IFACE="eth1"
IPTABLES="/usr/local/sbin/iptables"
#########
# Load all required IPTables modules
#
#
# Needed to initially load modules
#
/sbin/depmod -a
#
# Adds some iptables targets like LOG, REJECT and MASQUARADE.
#
/sbin/modprobe ipt_LOG
#/sbin/modprobe ipt_REJECT
/sbin/modprobe ipt_MASQUERADE
#
# Support for owner matching
#
#/sbin/modprobe ipt_owner
#
# Support for connection tracking of FTP and IRC.
#
#/sbin/modprobe ip_conntrack_ftp
#/sbin/modprobe ip_conntrack_irc
#
# Enable ip_forward, this is critical since it is turned off as defaul in Linux.
#
echo "1" > /proc/sys/net/ipv4/ip_forward
#
# Dynamic IP users:
#
#echo "1" > /proc/sys/net/ipv4/ip_dynaddr
#
# POSTROUTING chain in the nat table
#
#$IPTABLES -t nat -A POSTROUTING -p tcp --tcp-flags SYN,RST SYN -j TCPMSS --clamp-mss-to-pmtu
$IPTABLES -t nat -A POSTROUTING -o $INET_IFACE -j MASQUERADE
#
# Bad TCP packets we don't want
#
$IPTABLES -A FORWARD -p tcp ! --syn -m state --state NEW -j LOG --log-prefix "New not syn:"
$IPTABLES -A FORWARD -p tcp ! --syn -m state --state NEW -j DROP
#
# Accept the packets we actually want to forward
#
$IPTABLES -A FORWARD -i $LAN_IFACE -j ACCEPT
$IPTABLES -A FORWARD -m state --state ESTABLISHED,RELATED -j ACCEPT
$IPTABLES -A FORWARD -m limit --limit 3/minute --limit-burst 3 -j LOG --log-level DEBUG --log-prefix "IPT FORWARD packet died: "
#
# Set default policies for the INPUT, FORWARD and OUTPUT chains
#
$IPTABLES -P INPUT DROP
$IPTABLES -P OUTPUT DROP
$IPTABLES -P FORWARD DROP
#
# Create separate chains for ICMP, TCP and UDP to traverse
#
$IPTABLES -N icmp_packets
$IPTABLES -N tcp_packets
$IPTABLES -N udpincoming_packets
#
# The allowed chain for TCP connections
#
$IPTABLES -N allowed
$IPTABLES -A allowed -p TCP --syn -j ACCEPT
$IPTABLES -A allowed -p TCP -m state --state ESTABLISHED,RELATED -j ACCEPT
$IPTABLES -A allowed -p TCP -j DROP
#
# ICMP rules
#
$IPTABLES -A icmp_packets -p ICMP -s 0/0 --icmp-type 0 -j ACCEPT
$IPTABLES -A icmp_packets -p ICMP -s 0/0 --icmp-type 3 -j ACCEPT
$IPTABLES -A icmp_packets -p ICMP -s 0/0 --icmp-type 5 -j ACCEPT
$IPTABLES -A icmp_packets -p ICMP -s 0/0 --icmp-type 11 -j ACCEPT
#
# TCP rules
#
$IPTABLES -A tcp_packets -p TCP -s 0/0 --dport 21 -j allowed
$IPTABLES -A tcp_packets -p TCP -s 0/0 --dport 22 -j allowed
$IPTABLES -A tcp_packets -p TCP -s 0/0 --dport 80 -j allowed
$IPTABLES -A tcp_packets -p TCP -s 0/0 --dport 113 -j allowed
#
# UDP ports
#
$IPTABLES -A udpincoming_packets -p UDP -s 0/0 --source-port 53 -j ACCEPT
$IPTABLES -A udpincoming_packets -p UDP -s 0/0 --source-port 123 -j ACCEPT
$IPTABLES -A udpincoming_packets -p UDP -s 0/0 --source-port 2074 -j ACCEPT
$IPTABLES -A udpincoming_packets -p UDP -s 0/0 --source-port 4000 -j ACCEPT
#
# PREROUTING chain.
#
# Do some checks for obviously spoofed IP's
#
$IPTABLES -t nat -A PREROUTING -i $INET_IFACE -s 192.168.0.0/16 -j DROP
$IPTABLES -t nat -A PREROUTING -i $INET_IFACE -s 10.0.0.0/8 -j DROP
$IPTABLES -t nat -A PREROUTING -i $INET_IFACE -s 172.16.0.0/12 -j DROP
#
# INPUT chain
#
# Take care of bad TCP packets that we don't want
#
$IPTABLES -A INPUT -p tcp ! --syn -m state --state NEW -j LOG --log-prefix "New not syn:"
$IPTABLES -A INPUT -p tcp ! --syn -m state --state NEW -j DROP
#
# Rules for incoming packets from the internet
#
$IPTABLES -A INPUT -p ICMP -i $INET_IFACE -j icmp_packets
$IPTABLES -A INPUT -p TCP -i $INET_IFACE -j tcp_packets
$IPTABLES -A INPUT -p UDP -i $INET_IFACE -j udpincoming_packets
#
# Rules for special networks not part of the Internet
#
$IPTABLES -A INPUT -p ALL -i $LAN_IFACE -d $LAN_BCAST_ADRESS -j ACCEPT
$IPTABLES -A INPUT -p ALL -i $LO_IFACE -d $LOCALHOST_IP -j ACCEPT
$IPTABLES -A INPUT -p ALL -i $LAN_IFACE -d $LAN_IP -j ACCEPT
$IPTABLES -A INPUT -p ALL -i $INET_IFACE -m state --state ESTABLISHED,RELATED -j ACCEPT
$IPTABLES -A INPUT -m limit --limit 3/minute --limit-burst 3 -j LOG --log-level DEBUG --log-prefix "IPT INPUT packet died: "
#
# OUTPUT chain
#
$IPTABLES -A OUTPUT -p tcp ! --syn -m state --state NEW -j LOG --log-prefix "New not syn:"
$IPTABLES -A OUTPUT -p tcp ! --syn -m state --state NEW -j DROP
$IPTABLES -A OUTPUT -p ALL -s $LOCALHOST_IP -j ACCEPT
$IPTABLES -A OUTPUT -p ALL -s $LAN_IP -j ACCEPT
$IPTABLES -A OUTPUT -p ALL -o $INET_IFACE -j ACCEPT
$IPTABLES -A OUTPUT -m limit --limit 3/minute --limit-burst 3 -j LOG --log-level DEBUG --log-prefix "IPT OUTPUT packet died: "
Example rc.flush-iptables script
#!/bin/sh
#
# Resets the iptables to default values, in case you screw something up
# while setting your rc.firewall up - as I did quite a few times;)
#
# Author: Oskar Andreasson <blueflux@koffein.net>
# (c) of BoingWorld.com, use at your own risk, do whatever you please with
# it as long as you don't distribute this without due credits to
# BoingWorld.com
#
# Configurations
#
IPTABLES="/usr/local/sbin/iptables"
#
# reset the default policies in the filter table.
#
$IPTABLES -P INPUT ACCEPT
$IPTABLES -P FORWARD ACCEPT
$IPTABLES -P OUTPUT ACCEPT
#
# reset the default policies in the nat table.
#
$IPTABLES -t nat -P PREROUTING ACCEPT
$IPTABLES -t nat -P POSTROUTING ACCEPT
$IPTABLES -t nat -P OUTPUT ACCEPT
#
# flush all the rules in the filter and nat tables.
#
$IPTABLES -F
$IPTABLES -t nat -F
#
# erase all chains that's not default in filter and nat table.
#
$IPTABLES -X
$IPTABLES -t nat -X